Getting your tracks or stems from Ableton Live into the AI Mixing Studio
Getting your tracks or stems from Ableton Live into the AI Mixing Studio
Finding it hard to get your tracks or stems from Ableton Live into the AI Mixing Studio? You're not alone, so we decided to create a quick post on commonly asked questions on how to export stems and tracks from Ableton Live into the Mixing Studioso you can start mixing and distributing your finished tracks in no time.

You've composed and recorded your new track in Ableton Live, you're happy with the arrangement and how it flows. However, now you're left with the daunting task of mixing and mastering it, so you can get it up on Soundcloud or share previews with your fans on social media.
You know that this can be a tedious process with lots of fx tweaking, resting your ears and being unsure about what a good mix sounds like... In the end, you've decided to use the Unchained Music/Roex AI Mixing Studio to take care of all the legwork for you. The problem is that you're not quite sure what's the best way to export your tracks. Here's the best way to do it.
Should I remove any EQ or Compression effects on each track?
Since the Mixing Studio determines the best equalisation and compression settings for you, there's no need to do this beforehand in Ableton Live. However, if you're EQing or compressing for creative purposes, then by all means keep them. The studio uses EQ and compression to bring balance and clarity to your mix, leaving you to spend more time creatively shaping your sound.
Should I pan the tracks myself?
If you have a strong preference on how a track should be panned left or right, then by all means go ahead and do this in Ableton Live. You have the option to retain your preferred panning, by setting "Pan Preference" to "Centre" once you've uploaded your tracks. If you're unsure where it should be panned, then there's no need to worry. Just leave the settings as they normally are in Ableton Live and the Mixing Studio will figure out the best panning settings for your track.
Should I set the volume levels of each track myself?
There's no harm in doing this, but the Mixing Studio will automatically figure out the best volume level settings for each of your tracks. If you have a preference on which tracks should be a "lead" or sit in the background, you can specify this for each track once you've uploaded them. You can do this by changing the "Presence" setting for each track to either "Lead", "Normal" or "Background".
What should I do about Reverb?
RoEx Automix doesn't currently have the functionality of automatically applying reverb. This is a feature we are currently working on. For now, we would suggest applying the reverb settings that sound best to you.
Should I export individual tracks or stems?
First of all, the difference between an individual track and a stem is this. Individual tracks are usually recordings of just one instrument. In a drum kit, you could have individual audio tracks for the kick, snare, cymbals etc. These can either be recorded in mono or stereo.
Stems are stereo recordings sourced from mixes of multiple individual audio tracks, such as drums, vocals, and bass. For example, a drum stem will typically be a stereo audio file that sounds like all of the drum tracks mixed together i.e kick, snare cymbals.
You can use o mix stems from individual tracks or you can import stems that you've pre-mixed in Ableton Live. This is entirely up to you and you can use either to create your final mix.
Does the AI Mixing Studio apply any creative FX?
We currently don't give the option to apply any creative FX. However, this is a feature we plan to add in a later release. In the meantime, we would suggest applying all your creative FX in Ableton for now.
How do I export individual tracks/stems from Ableton Live?
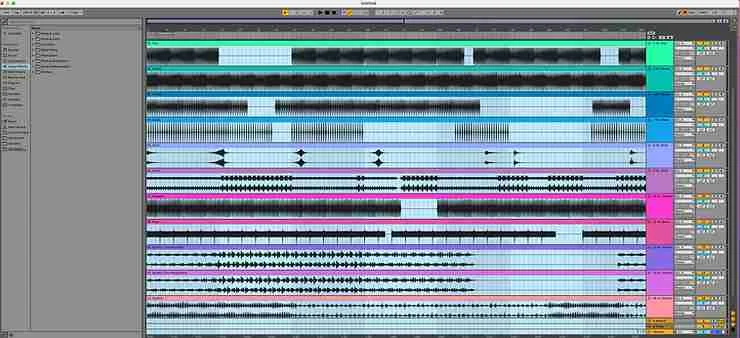
Make sure you're in arrangement view and press CMD - A if you're on a Mac or CTRL - A if you're on Windows. This will make sure your whole arrangement is selected. If you're not sure what the arrangement view is, this is the view where you can see where all your tracks are printed on the screen going from left to right.

Ableton Live's arrangement view
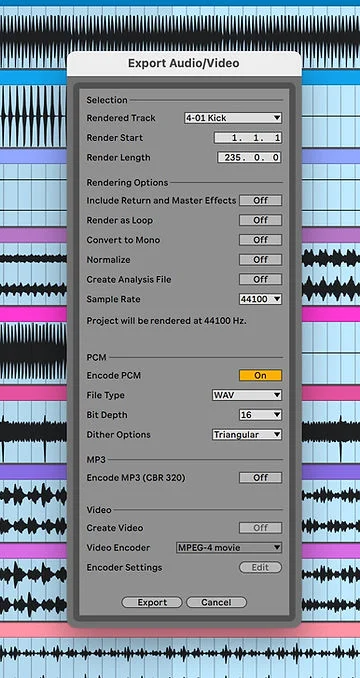
To export your audio you now need to click on "File" and then "Export Audio/Video". This should bring up a small window with various options. The keyboard shortcut for Mac is CMD - Shift - R and for Windows is CTRL - Shift - R.

Export Audio/Video Dialog Window Ableton Live
You will need to export each individual track or stem from Ableton Live using similar settings as shown in the figure above. You can change what track you are exporting by changing the dropdown for "Rendered Track". The "Render Length" will entirely depend on the length of your track. It's best to export everything with a "Sample Rate" of "44100" and with "File Type" set to "WAV". Make sure to use descriptive file names for each track you export i.e. "kick.wav".

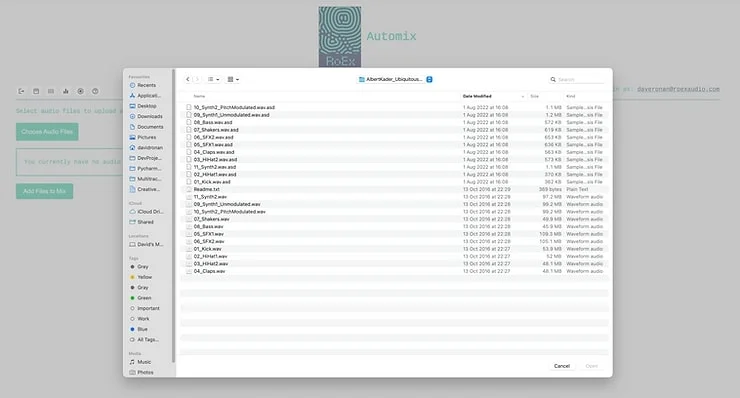
Once all your tracks are exported somewhere, open up the Mixing Studio, click on "Choose Audio File" and select all the audio files you want to upload. Once you're happy with your selection, click on "Add Files to Mix" to start the upload process. Once everything is uploaded, you just need to give some basic mix settings, select what tracks you want to mix and then click on the "Rocket" icon to create a mix. In a few moments, you should have a professional and balanced sounding mix-down or stem.
What if don't use Ableton Live and use another DAW?
The recommendations about what to do for your individual tracks and stems above still stand, but the process of actually exporting the individual tracks or stems will be different, but not hugely different. If you'd like us to put together a short blog post on how to do this for other popular DAW's please don't hesitate to ask on our socials or in our Discord.
This is a guest post from David Ronan, originally published on roexaudio.com